Let’s be honest. The thought of installing a new floor can be daunting. You’re picturing messy adhesives, noisy nail guns, and a project that stretches on for weeks. But what if there was a way to get that beautiful, new-floor feel without the traditional headache? Well, there is. It’s called a floating floor.
Honestly, for the eager DIYer, floating floors are a game-changer. They’re designed to be installed over your existing subfloor without being glued or nailed down. Think of it like a giant, heavy puzzle that just… floats. The pieces lock together, creating a single, stable surface that sits on top of your old floor. It’s surprisingly straightforward.
Why a Floating Floor is Your DIY Best Friend
So, why should you, a weekend warrior, consider this route? The benefits are pretty compelling.
- No Specialized Tools Needed: You can forget about renting a floor nailer or dealing with toxic adhesives. A tapping block, a pull bar, a rubber mallet, and a good saw are pretty much your main squad.
- Speed: You can often install an entire room in a single weekend. Seriously. The click-and-lock systems are that efficient.
- Forgiveness: Made a mistake? With a glued-down floor, it’s a disaster. With a floating floor, you can usually just unlock the boards and try again. It’s the most forgiving flooring project you’ll ever tackle.
- Cost-Effective: You save a bundle on both labor and specialized tool rentals.
Choosing Your Floating Floor Material
Not all floating floors are created equal. The term actually covers a few different materials, each with its own personality. Here’s the deal on the most common DIY-friendly options.
| Material Type | Best For | DIY Notes |
| Laminate | High-traffic areas, budgets, realistic wood/stone looks. | Super durable and scratch-resistant. Not great for wet areas like full bathrooms. |
| Luxury Vinyl Plank (LVP) | Kitchens, basements, bathrooms—anywhere moisture is a concern. | 100% waterproof options are huge right now. Feels softer underfoot and is very easy to cut. |
| Engineered Wood | Anyone wanting a real wood surface with DIY ease. | Has a thin veneer of real hardwood on top. Offers that authentic feel but requires a bit more care during installation to avoid scratching the surface. |
Gearing Up: Your DIY Tool Kit
You don’t need a contractor’s truck full of tools, but having the right gear makes all the difference. Here’s your shopping list:
- Tapping Block & Pull Bar: These are non-negotiable. The block helps you snugly connect planks, and the pull bar is for those tight spaces against the wall.
- Rubber Mallet: Used with the tapping block—gentle taps are all you need.
- Spacers: These little wedges are crucial. They create the expansion gap around the room’s perimeter, allowing the floor to breathe and expand with humidity changes.
- A Good Saw: A jigsaw is fantastic for tricky cuts around door jambs. A miter saw or a simple handsaw will work for straight cuts. For LVP, a utility knife often does the trick.
- Measuring Tape, Pencil, and a Straight Edge: The classics. Don’t skimp here.
- Level: To check your subfloor for major dips or humps.
The Foundation: Prepping Your Subfloor
This is, without a doubt, the most important step. A floating floor will mirror every imperfection in your subfloor. A bump will become a high spot; a dip will become a soft, spongy area. You know the saying: fail to prepare, prepare to… have a floor you’re not happy with.
First, sweep and vacuum like you’ve never vacuumed before. Every piece of grit is an enemy. Next, lay down the underlayment. This foam layer is your secret weapon. It provides cushioning, reduces noise, and acts as a moisture barrier. It typically just rolls out and you tape the seams together. Easy.
The Installation Process: Let’s Lay Some Floor
Step 1: Plan Your Layout
Don’t just start slapping planks down from one wall. Find the longest, straightest wall and use that as your starting point. Dry-fit a few rows to see how the end pieces will look. You want to avoid having skinny, little slivers of plank at the far end. A good rule of thumb is to never have an end joint that’s less than 6 inches long. Stagger those seams randomly for a natural, professional look.
Step 2: The First Row is Everything
This row sets the stage for the entire installation. It has to be perfectly straight. Place your spacers against the wall every foot or so. Connect the planks for the first row, making sure the tongue-side is facing the room (check your manufacturer’s instructions, but this is usually the case). That first row is a bit fiddly, but take your time. A crooked start means a crooked finish.
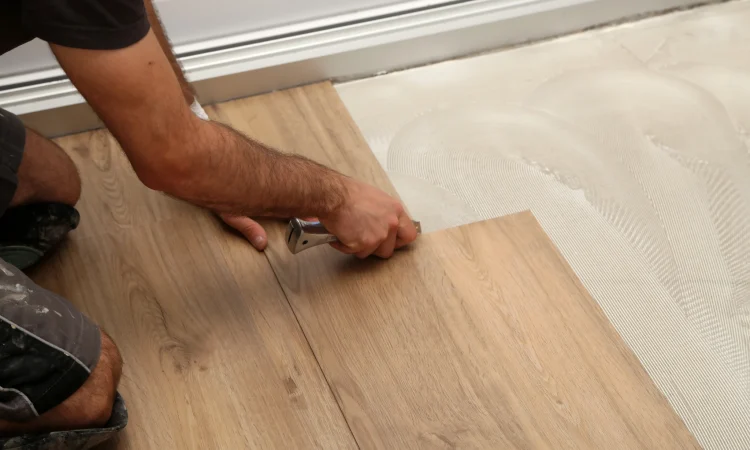
Step 3: Click, Lock, and Tap
For the second row, you’ll typically angle the tongue of the new plank into the groove of the first row’s plank and then press down until it clicks. Use your tapping block and mallet to gently close any small gaps. Work your way across the room this way, “stair-stepping” your layout. It’s a satisfying rhythm once you get going.
Step 4: Navigating the Tricky Bits
Doorways are the classic DIY challenge. The trick is to undercut the door jamb so your flooring can slide right underneath it. You can use a handsaw and a scrap piece of flooring as a guide to get the height just right. It creates a super clean look without having to cut complex shapes.
For pipes, measure carefully and drill a hole in the plank that’s slightly larger than the pipe diameter. You can then cut the plank to fit around it and use a faceplate to cover the gap.
Step 5: The Final Row
This is where the pull bar becomes your best friend. You’ll need to measure the gap to the wall and rip-cut your planks to fit. Place the plank in position, hook the pull bar against it, and give it a tap with the mallet to lock it in place. It can be a tight squeeze, but it’s the final hurdle.
A Few Pro-Tips from the Trenches
Mix boxes as you go. Planks can have slight color variations from one box to another. By mixing them, you ensure a blended, natural appearance. And always, always buy about 10% more material than you need for waste and mistakes. Running out with one row left is a special kind of frustration.
Let your flooring acclimate to the room’s temperature and humidity for at least 48 hours before you install it. Just open the boxes and let them sit. This prevents major expansion or contraction after the fact.
The Final Touch
Once the last plank is in, you can remove the spacers. Now, install your baseboards and/or quarter-round molding to cover the expansion gap. This is what gives the installation that finished, built-in look. It’s the frame for your new floor masterpiece.
Standing back and looking at a room you’ve floored yourself is a unique kind of satisfaction. It’s not just about saving money—though that’s a great perk. It’s about the quiet pride of having built something lasting with your own hands. A floating floor installation proves that some of the best home improvements aren’t about brute force, but about smart, simple systems. And that’s a pretty solid foundation for any DIY project.